Extendible Hash Table 属于动态哈希的一种,网上有很多关于它的介绍,但是真的在实现它的时候,或多或少有着很多问题。网上很多教程光讲怎么扩容,不讲收缩,而且网上很多都是概念性的东西,不讲代码实操。因 CMU 15-445 的课程需要,自己捣鼓了一下算法流程,这里分享一下。
在看之前请自行了解 Extendible Hash Table 的概念:
https://www.geeksforgeeks.org/extendible-hashing-dynamic-approach-to-dbms/
http://www.mathcs.emory.edu/~cheung/Courses/554/Syllabus/3-index/extensible-hashing.html
约定
在开始讲解算法前,我们先进行一些规则的约定。
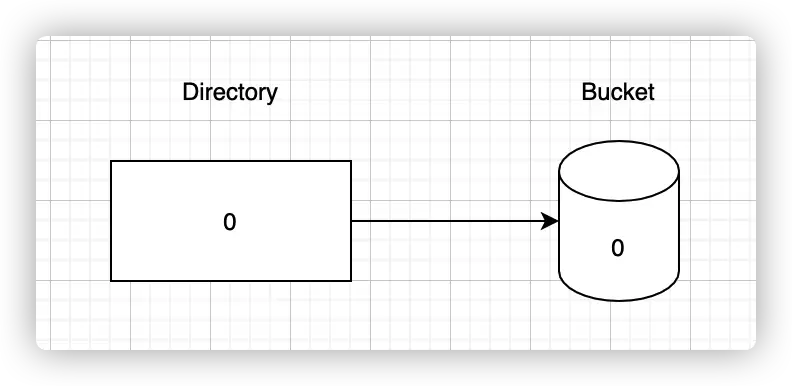
- 目录叫 Directory, 桶叫 bucket,bucket 在 directory 的序号叫 index。
- 每一个 bucket 的空间指向一个 page,存在多个 bucket 公用同一个 page 的情况
- 扩容叫 grow,收缩叫 shrink。
- 初始的 $GlobalDepth=0$,且只有一个 Bucket,该 bucket 的 $LocalDepth=0,Index=0$。

- 进行分流的操作统一从低位开始,比如 $GlobalDepth=2, HASH(A)=1110$,因为我们从低位开始,所以 $MASK=11$,那么我们进行
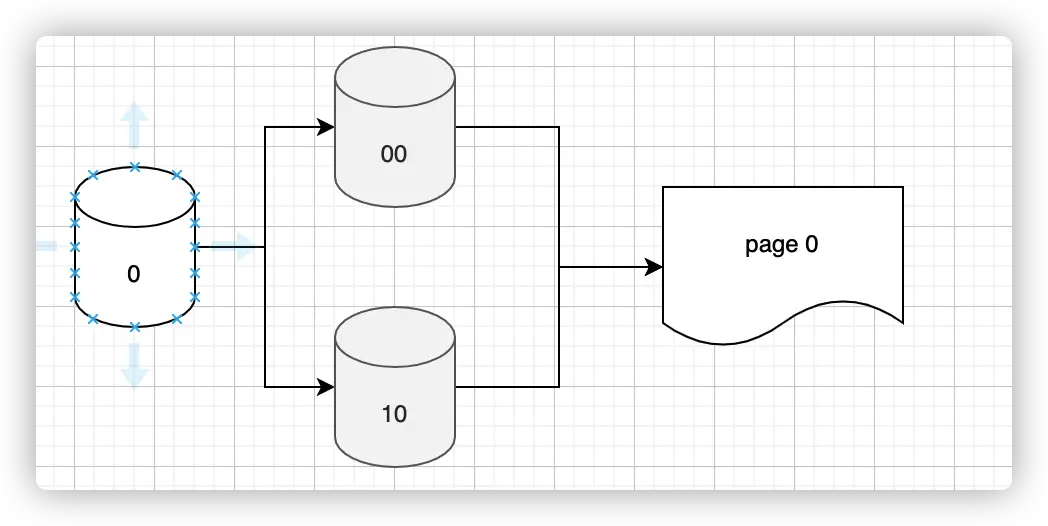
HASH(A) & Mask = 10,也就是序号为 2 的bucket。 - 我们定义 split image bucket 就是该 bucket 在分裂时候产生的兄弟,比如 10 的兄弟是 00。也就是 bucket 序号为 0,2 的两个桶。如下图,0 bucket 分裂后生成 00 和 10 两个 bucket,它们两个 bucket 互为 split image bucket。但是它们仍然公用一个 page 0。
辅助类算法
根据 bucket 的 local depth 生成其对应的 mask
mask 的作用就是通过和 HASH 值 & 运算得到 bucket index。
uint32_t HashTableDirectoryPage::GetLocalDepthMask(uint32_t bucket_idx) {
  uint8_t depth = local_depths_[bucket_idx];
  return (1 << depth) - 1;
}
找到一个 bucket 的 split image bucket index
uint32_t HashTableDirectoryPage::GetSplitImageIndex(uint32_t bucket_idx) {
  uint32_t local_depth = local_depths_[bucket_idx];
  return bucket_idx ^ (1 << (local_depth - 1));
}
Directory Grow
根据规则,当某一个 local depth 大于 global depth 时,则需要对 directory 进行 grow。Grow 时,将原有的 bucket 复制一遍,然后追加到末尾上去即可。
void HashTableDirectoryPage::IncrGlobalDepth() {
  int origin_num = 1 << global_depth_;
  int new_index = origin_num;
  int origin_index = 0;
  for (; origin_index < origin_num; new_index++, origin_index++) {
    bucket_page_ids_[new_index] = bucket_page_ids_[origin_index];
    local_depths_[new_index] = local_depths_[origin_index];
  }
  global_depth_++;
}
注意:这里并没有包含数据的迁移,扩容后,每一对 bucket 都还是使用着同一块 page 空间。
Directory Shrink
当所有 bucket 的 local depth 均小于 global depth 的时候,就可以对 directory 进行一次收缩。收缩直接 global_depth – 1即可。
Insert 插入(含 Grow)
- 计算插入数据 A Key 的 Hash 值。
- 与 global depth 进行 & 运算,得到其 bucket index。
- 如果 bucket index 没满,直接插入即可,返回成功,否则进行步骤 4。
- 增加对应 bucket index 的 local depth,然后根据新的 local depth 计算得到它的 image split bucket index。
- 如果新的 local depth 大于 global depth,对 directory 进行扩容。
- 给 image split bucket index 申请一个新的 page 空间,从 bucket index 的 bucket page 中拷贝数据 data,然后清空 bucket index 中的内容。根据当前 local depth 产生的 mask 对 data 重新分配。注意,data 中的数据只会落入当前 bucket page 和 image split bucket page 两个 page 中(注意我这里说的是 page 而不是 bucket)。至此,原数据的迁移完成。
- 将所有同一级的 bucket 设置为相同的 local depth 和 page,这样说不清,直接看代码吧。
- 重新尝试插入 A,回到步骤 1。
第 7 步代码:
//-------------
uint32_t diff = 1 << dir_page->GetLocalDepth(split_bucket_index);
for (uint32_t i = split_bucket_index; i >= 0; i -= diff) {
  dir_page->SetBucketPageId(i, split_bucket_page_id);
  dir_page->SetLocalDepth(i, dir_page->GetLocalDepth(split_bucket_index));
  if (i < diff) {
    // avoid negative because we are using unsigned int32 i
    break;
  }
}
for (uint32_t i = split_bucket_index; i < dir_page->Size(); i += diff) {
  dir_page->SetBucketPageId(i, split_bucket_page_id);
  dir_page->SetLocalDepth(i, dir_page->GetLocalDepth(split_bucket_index));
}
for (uint32_t i = split_image_bucket_index; i >= 0; i -= diff) {
  dir_page->SetBucketPageId(i, image_bucket_page);
  dir_page->SetLocalDepth(i, dir_page->GetLocalDepth(split_bucket_index));
  if (i < diff) {
    // avoid negative
    break;
  }
}
for (uint32_t i = split_image_bucket_index; i < dir_page->Size(); i += diff) {
  dir_page->SetBucketPageId(i, image_bucket_page);
  dir_page->SetLocalDepth(i, dir_page->GetLocalDepth(split_bucket_index));
}
Remove 删除
- 计算删除数据 A Key 的 Hash 值。
- 与 global depth 进行 & 运算,得到其 bucket index。
- 从 bucket index 对应的 page 中进行查找,找到了就直接删除,找不到就返回不存在。
- 判断删除后的 bucket 是否为空,如果为空,对该 bucket 进行 Shrink 操作。
Shrink 收缩
Shrink 这块比较复杂, 我的实现比较简单,就是只有当 remove 后 bucket 为空时才进行 Shrink,并不会自动扫描当前有哪些 bucket 为空,然后进行 Shrink。这样做其实没必要,毕竟频繁的扩容收缩会带来性能上的损耗。这也是为什么很多文章根本不讲 Shrink 的原因。
注意,bucket 的 local depth 为 0 时,是不进行 Shrink 的。
只有当 bucket 和其 split image bucket 的 local depth 相同时,才会进行 Shrink。
- 检查 target bucket 是否为空,不为空直接返回。
- 检查 target bucket 的 local depth 是否大于 0,且和其 split image bucket 的 local depth 相同,不符合要求直接返回。
- 遍历整个 directory ,将所有指向 target bucket page 的 bucket 全部重新指向 split image bucket 的 page。
- 将重新指向过的 bucket 的 local depth 均 -1。
- 尝试进行 directory 的 shrink。
总结
写的比较简单,适合有基础的人看,毕竟也没有那么多时间做一个详尽的图文教程了。希望大家在 CMU 15-445 的海洋里面快乐的遨游。
原创文章,作者:Smith,如若转载,请注明出处:https://www.inlighting.org/archives/extendible-hash-table-algorithm
 微信扫一扫
微信扫一扫
评论列表(41条)
大佬能求一份源码吗,项目里有关并发执行的一些细节自己不知道如何实现。
@小学:以下楼层均已发
大佬能求一份源码吗,项目里有关并发执行的一些细节自己不知道如何实现。
求个源码
楼主你好,可以求一份代码吗?
博主问一下,你的shrink方法和homework这个一样吗?
https://15445.courses.cs.cmu.edu/fall2022/files/hw2-sols.pdf
这里似乎提出了一种方法
@whznpu_ruc:一样的
楼主,能求份源码吗,debug好久没找到问题,万分感谢
同学您好,可否发一份代码
佬,请问有没有自己写测试用例来测试,我写了一个大批量的插入删除来测试 split 和 merge,本地是能成功的 split 和 merge,但是在线测试 SplitGrowTest 过不了,如果有写的话可以发一下测试吗?
@Kenerl:不用了佬,我 debug 出来了,脑子一抽觉得插入失败要么是重复要么是满了,没有考虑满了也会重复的情况。
@Kenerl:我发你了呀,难道你邮箱没收到?
@Smith:谢谢,邮箱没有开消息提醒,然后觉得应该没有这么快发过来,在回复之前就没有看邮箱了🙌
楼主能发一份源码吗,DEBUG心态小崩,非常感谢
同学,想请问一下cmu的那个测评网站project2有超时提示吗?我提交过后一直显示hasn’t finished running yet.
@xin:同学,我找到原因了。
@xin:ook
能否法一下代码
@GeekWu:此楼之前均已发。
老哥,带一份源码参考下,谢谢
您好,我使用的方法和你差不多,但在执行test_memory_safety时会timeout,前面的都能正确通过。请问有什么优化性能的建议呢。
@daiym:发你代码了,你看看吧。按道理 test_memory_safety 不会 timeout 的。
@Smith:其实有可能的,在 test_memory_safety 里用时会翻20多倍。
@daiym:好吧,时间太久了,都忘了。
求份代码找bug
求份代码找bug
大哥可以分享一份源码嘛
RemoveTest 总是执行不完,没有Ok,也没有Fail,本地无法复现,可以也发份代码吗
@jared:发了
@Smith:太感谢了,原来是bucket page insert的时候要利用之前被删除的slot, 现在改完了之后总算满分过了!!
老哥,能求份源码吗,万分感谢
想问 smith哥,我理解的 SplitInsert 最后需要 把当前SplitInsert的两个bucket 重新映射page,以及设置local depth
那这个把所有同一级的 bucket 设置为相同的 local depth 和 page 具体是指什么呢 ,不理解第七步 四个for函数的作用是什么,而且此时diff 的值不会是比 split_image_bucket_index 和 split_bucket_index 还要大吗 (然后此时也能达到重新映射和设置local depth的结果 )
@Jojo:额,感觉你还没有把逻辑搞清楚,你可以看看 https://www.geeksforgeeks.org/extendible-hashing-dynamic-approach-to-dbms/,源码我也私发你邮箱了。
说实话有些细节我自己都忘了,最近比较忙,没有时间回味。
@Jojo:那四个for循环的作用应该是在目录扩容后,将扩容的同级bucket的depth和page_id进行复制吧。
@Jojo:hxd,不知道你理解了吗,我遇到和你一样的问题了
佬,能请教一下你的插入和删除寻找兄弟节点的算法是同一个吗。
@Tusen:我私发你代码了,要不自己看看源码,最近有点忙。
@Smith:好的。我改完了。最后发现,如果桶为空,但是remove失败,也要尝试删除空桶。
。
@Tusen:只有当 Bucket 满了,该 Bucket 才会分裂成两个 Page。不然当分裂操作发生时,一些 Bucket 明明没有满的 page,也分裂成两个 page,会产生不必要的数据移动和空间的浪费。
建议你看看:https://www.geeksforgeeks.org/extendible-hashing-dynamic-approach-to-dbms/,先把流程搞清楚哈。
@Smith:OK,我先看看。lecture给的资料太少了T-T